Topology Guide
Slurm can be configured to support topology-aware resource allocation to optimize job performance. Without a topology plugin, Slurm's native mode of resource selection considers nodes as a one-dimensional array and allocates resources on a best-fit basis.
Contents
- Tree Topology (Hierarchical Networks)
- Block Topology
- Ring Topology
- 3D Torus Topology
- User Options
- Environment Variables
- Multiple Topologies
- Dynamic Topology
Tree Topology (Hierarchical Networks)
Slurm can also be configured to allocate resources to jobs on a hierarchical network to minimize network contention. The basic algorithm is to identify the lowest level switch in the hierarchy that can satisfy a job's request and then allocate resources on its underlying leaf switches using a best-fit algorithm. Use of this logic requires a configuration setting of TopologyPlugin=topology/tree.
Note that slurm uses a best-fit algorithm on the currently
available resources. This may result in an allocation with
more than the optimum number of switches. The user can request
a maximum number of leaf switches for the job as well as a
maximum time willing to wait for that number using the --switches
option with the salloc, sbatch and srun commands. The parameters can
also be changed for pending jobs using the scontrol and squeue commands.
At some point in the future Slurm code may be provided to gather network topology information directly. Now the network topology information must be included in a topology.conf configuration file as shown in the examples below. The first example describes a three level switch in which each switch has two children. Note that the SwitchName values are arbitrary and only used for bookkeeping purposes, but a name must be specified on each line. The leaf switch descriptions contain a SwitchName field plus a Nodes field to identify the nodes connected to the switch. Higher-level switch descriptions contain a SwitchName field plus a Switches field to identify the child switches. Slurm's hostlist expression parser is used, so the node and switch names need not be consecutive (e.g. "Nodes=tux[0-3,12,18-20]" and "Switches=s[0-2,4-8,12]" will parse fine).
An optional LinkSpeed option can be used to indicate the relative performance of the link. The units used are arbitrary and this information is currently not used. It may be used in the future to optimize resource allocations.
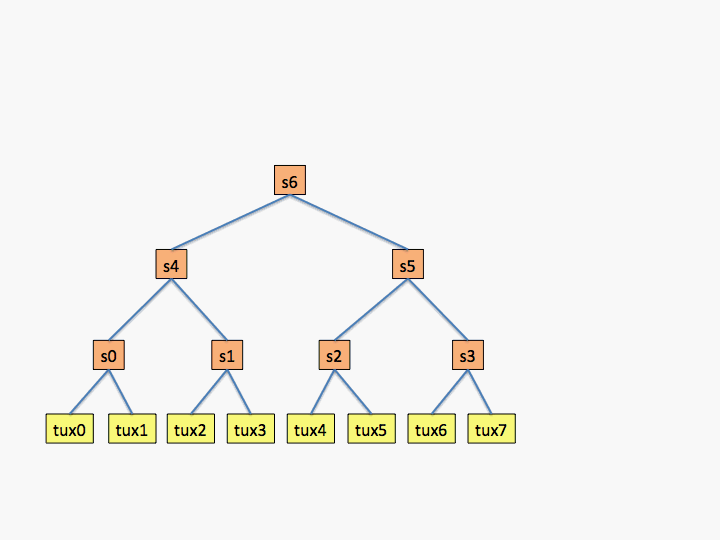
The first example shows what a topology would look like for an eight node cluster in which all switches have only two children as shown in the diagram (not a very realistic configuration, but useful for an example).
# topology.conf
# Switch Configuration
SwitchName=s0 Nodes=tux[0-1]
SwitchName=s1 Nodes=tux[2-3]
SwitchName=s2 Nodes=tux[4-5]
SwitchName=s3 Nodes=tux[6-7]
SwitchName=s4 Switches=s[0-1]
SwitchName=s5 Switches=s[2-3]
SwitchName=s6 Switches=s[4-5]
The next example is for a network with two levels and each switch has four connections.
# topology.conf
# Switch Configuration
SwitchName=s0 Nodes=tux[0-3]   LinkSpeed=900
SwitchName=s1 Nodes=tux[4-7]   LinkSpeed=900
SwitchName=s2 Nodes=tux[8-11]  LinkSpeed=900
SwitchName=s3 Nodes=tux[12-15] LinkSpeed=1800
SwitchName=s4 Switches=s[0-3]  LinkSpeed=1800
SwitchName=s5 Switches=s[0-3]  LinkSpeed=1800
SwitchName=s6 Switches=s[0-3]  LinkSpeed=1800
SwitchName=s7 Switches=s[0-3]  LinkSpeed=1800

As a practical matter, listing every switch connection definitely results in a slower scheduling algorithm for Slurm to optimize job placement. The application performance may achieve little benefit from such optimization. Listing the leaf switches with their nodes plus one top level switch should result in good performance for both applications and Slurm. The previous example might be configured as follows:
# topology.conf
# Switch Configuration
SwitchName=s0 Nodes=tux[0-3]
SwitchName=s1 Nodes=tux[4-7]
SwitchName=s2 Nodes=tux[8-11]
SwitchName=s3 Nodes=tux[12-15]
SwitchName=s4 Switches=s[0-3]
Note that compute nodes on switches that lack a common parent switch can be used, but no job will span leaf switches without a common parent (unless the TopologyParam=TopoOptional option is used). For example, it is legal to remove the line "SwitchName=s4 Switches=s[0-3]" from the above topology.conf file. In that case, no job will span more than four compute nodes on any single leaf switch. This configuration can be useful if one wants to schedule multiple physical clusters as a single logical cluster under the control of a single slurmctld daemon.
If you have nodes that are in separate networks and are associated with unique switches in your topology.conf file, it's possible that you could get in a situation where a job isn't able to run. If a job requests nodes that are in the different networks, either by requesting the nodes directly or by requesting a feature, the job will fail because the requested nodes can't communicate with each other. We recommend placing nodes in separate network segments in disjoint partitions.
For systems with a dragonfly network, configure Slurm with TopologyPlugin=topology/tree plus TopologyParam=dragonfly. If a single job can not be entirely placed within a single network leaf switch, the job will be spread across as many leaf switches as possible in order to optimize the job's network bandwidth.
NOTE: When using the topology/tree plugin, Slurm identifies the network switches which provide the best fit for pending jobs. If nodes have a Weight defined, this will override the resource selection based on network topology.
Configuration Generators
The following independently maintained tools may be useful in generating the topology.conf file for certain switch types:
- Infiniband switch - slurmibtopology
https://github.com/OleHolmNielsen/Slurm_tools/tree/master/slurmibtopology - Omni-Path (OPA) switch - opa2slurm
https://gitlab.com/jtfrey/opa2slurm - AWS Elastic Fabric Adapter (EFA) - ec2-topology
https://github.com/aws-samples/ec2-topology-aware-for-slurm
Block Topology
Slurm can be configured to allocate resources to jobs within a strictly enforced, hierarchical block structure using TopologyPlugin=topology/block. The block topology prioritizes the placement of jobs to minimize fragmentation across the cluster, as opposed to the tree topology, which focuses on fitting jobs on the first available resources. Small jobs will still be able to use the available space in a block that is partially used.
The block topology approach begins with "base blocks" (bblocks), which are fundamental, contiguous groups of nodes defined in topology.conf. These base blocks can be combined with other adjacent base blocks to form "aggregated blocks". In turn, these higher-level blocks can be aggregated with other contiguous blocks of the same hierarchical level to construct progressively larger blocks. This hierarchical arrangement is designed to ensure optimized communication performance for jobs running within these blocks. The BlockSizes configuration parameter defines the specific, enforceable block sizes at each level of this hierarchy.
The allocation algorithm operates as follows:
- Identify the smallest block level, as defined by BlockSizes, that can satisfy the job's resource request
- Select a suitable subset of "lower-level blocks" (llblocks) that are components of this chosen aggregating block
- Allocate resources from the underlying base blocks that constitute this selected subset of llblocks, employing a best-fit algorithm for the precise placement of the job.
Limitations
Since the block topology takes a different approach than the traditional tree topology, there are limitations that should be taken into consideration.
- Ranges of nodes
When using-N/--nodesto specify a range of acceptable node counts, the scheduler will have to evaluate each value of that range to find optimal placement on the available block(s). If using a range is necessary, the number of possible values should be kept as small as possible. - Requesting specific nodes
Using-w/--nodelistto request a specific node or nodes can conflict with the block placement. Because topology enforcement takes precedence, this will prevent the job from receiving an allocation. You can use-x/--excludeto prevent a job from being scheduled on certain nodes. - Contiguous blocks
The scheduler will attempt to place jobs on blocks that are adjacent to each other in the block structure. You cannot currently request that a job be placed on non-adjacent blocks.
Ring Topology
Slurm 26.05 introduced ring topologies with TopologyPlugin=topology/ring. This plugin models the cluster as one or more ordered rings of nodes. Jobs are allocated using contiguous segments of nodes in the ring, which may wrap at the end of the ring.
Rings can be defined in topology.conf using RingName and Nodes. The order of Nodes establishes the ring position (starting at 0). A maximum of 16 nodes can be specified per ring.
# topology.conf
RingName=ring0 Nodes=node[01-08]
RingName=ring1 Nodes=node[09-16]
When using topology.yaml, the following lines would define a ring topology equivalent to the previous example:
- topology: topo-ring
  cluster_default: true
  ring:
    rings:
      - ring: ring0
        nodes: node[01-08]
      - ring: ring1
        nodes: node[09-16]
For dynamic or cloud nodes, the Topology
field uses the ring name and position: Topology=topo-ring:ring0:3.
The ring position must be 0 when creating a new ring.
3D Torus Topology
The topology/torus3d plugin models the cluster as one or more 3D torus networks. Jobs are allocated contiguous sub-cubes of nodes within a torus, enforcing placement shapes defined by the administrator.
Each torus is defined with X, Y, and Z dimensions. Nodes are mapped into the 3D coordinate space either directly (via a flat node list in x-major order) or through regions that map subsets of coordinates to specific nodes. Regions must fit within the torus dimensions and do not wrap around boundaries. Regions are useful when nodes have sparse or non-contiguous naming.
Each placement specifies a sub-cube shape (e.g., 2x2x1, 2x2x2). Jobs requesting a number of nodes matching a placement size are allocated a contiguous sub-cube of that shape, which may wrap around torus boundaries. The scheduler selects the best placement based on node weight, fragmentation cost, and torus utilization. Jobs requesting a node count that does not match any configured placement size will not receive an allocation.
The torus3d plugin supports the --segment option, where
the value specifies the segment size (number of nodes per placement).
The total node count must be evenly divisible by the segment size, and
the segment size must match a configured placement size. Each segment is
allocated as one placement sub-cube. Segments may span different toruses.
The torus3d topology can only be configured via topology.yaml. Example:
- topology: topo-torus
  cluster_default: true
  torus3d:
    toruses:
      - name: pod1
        dims:
          x: 4
          y: 4
          z: 2
        nodes: node[01-32]
        placements:
          - dims:
              x: 2
              y: 2
              z: 1
          - dims:
              x: 2
              y: 2
              z: 2
          - dims:
              x: 4
              y: 4
              z: 2
With the above configuration, jobs can be allocated in groups of 4 (2x2x1),
8 (2x2x2), or 32 (4x4x2) nodes. For example, a 16-node job with
--segment=8 specifies 8 nodes per segment, resulting in
two 2x2x2 placements (16 / 8 = 2 segments).
Regions allow sparse node naming within a torus. Anchor spacing can be used to control placement anchor generation. By default anchors are spaced at the placement dimensions. Custom anchor_spacing allows overlapping placements on the torus. anchor_seed shifts the entire anchor grid by a coordinate offset:
- topology: topo-torus
  cluster_default: true
  torus3d:
    toruses:
      - name: pod1
        dims:
          x: 4
          y: 4
          z: 2
        regions:
          - anchor: {x: 0, y: 0, z: 0}
            dims: {x: 4, y: 2, z: 2}
            nodes: rack1-node[01-16]
          - anchor: {x: 0, y: 2, z: 0}
            dims: {x: 4, y: 2, z: 2}
            nodes: rack2-node[01-16]
        placements:
          - dims: {x: 2, y: 2, z: 2}
          - dims: {x: 4, y: 2, z: 1}
            anchor_spacing: {x: 2, y: 2, z: 1}
          - dims: {x: 4, y: 2, z: 1}
            anchor_seed: {x: 1, y: 0, z: 0}
For dynamic or cloud nodes, the Topology
field uses the torus name and coordinates:
Topology=topo-torus:pod1:2:3:1.
Hostlist functions torus{pod1} and
toruswith{node01} can be used to expand to all nodes in
a torus or to all nodes sharing a torus with a given node.
User Options
When a tree topology is configured, users can also specify the
maximum number of leaf switches to be used for their job with the maximum time
the job should wait for this optimized configuration. The syntax for this option
is --switches=count[@time].
The system administrator can limit the maximum time that any job can
wait for this optimized configuration using the SchedulerParameters
configuration parameter with the
max_switch_wait option.
When a block, ring, or torus3d topology is configured, the following option is available for job submissions:
--segment=<segment_size>
When a block, ring, or torus3d topology is used, this defines the size of the segments that will be used to create the job allocation. For topology/torus3d, each segment corresponds to one placement sub-cube. For topology/block, no requirement would be placed on all segments for a job needing to be placed within the same higher-level block.
NOTE: If the requested node count (--nodes) is larger than the requested segment size, it must also be evenly divisible by the segment size. If all nodes fit within a single segment, this option has no effect.
The following options only apply to a block topology:
--spread-segments
Prevent nodes within the same base block from being allocated to separate segments within the same block.--consolidate-segments
Ensure that all segments from the allocation will be consolidated into one higher-level aggregated block.
When a block, tree, ring, or torus3d topology is configured, hostlist functions may be used in place of or alongside regular hostlist expressions in commands or configuration files that interact with the slurmctld. Valid topology functions include:
block{blockX}
switch{switchY}
ring{ringZ}
torus{torusW} |
Expand to all nodes in the specified topology unit |
blockwith{nodeX}
switchwith{nodeY}
ringwith{nodeZ}
toruswith{nodeW} |
Expand to all nodes in the same topology unit as the specified node |
Hostlist functions can be used in several different contexts, for example:
scontrol update node=block{b1} state=resume
sbatch --nodelist=switchwith{node0} -N 10 program
PartitionName=Ring10 Nodes=ring{ring10} ...
See also the hostlist function feature{myfeature}
here.
Environment Variables
If the topology/tree plugin is used, two environment variables will be set to describe that job's network topology. Note that these environment variables will contain different data for the tasks launched on each node. Use of these environment variables is at the discretion of the user.
SLURM_TOPOLOGY_ADDR: The value will be set to the names network switches which may be involved in the job's communications from the system's top level switch down to the leaf switch and ending with node name. A period is used to separate each hardware component name.
SLURM_TOPOLOGY_ADDR_PATTERN: This is set only if the system has the topology/tree plugin configured. The value will be set component types listed in SLURM_TOPOLOGY_ADDR. Each component will be identified as either "switch" or "node". A period is used to separate each hardware component type.
Multiple Topologies
Slurm 25.05 introduced the ability to define multiple network topologies using the topology.yaml configuration file. Each partition can be configured to use a specific topology by specifying the Topology in its partition configuration line. The Slurm controller will use the selected topology to optimize resource allocation for jobs submitted to that partition. If no topology is explicitly specified for a partition, Slurm will default to the cluster_default topology.
Dynamic Topology
Nodes can be dynamically added to and removed from topologies, defined in either topology.conf or topology.yaml, by either using scontrol to update the node's topology or by using the slurmd's --conf option to specify the node's topology for dynamic or cloud nodes.
This is done by specifying the Topology option and providing the list
of topology names and units. Note that the topology defined in the
topology.conf file will always have the name "default".
A topology unit is the block name, the name of a leaf switch, the ring
name and position, or the torus name and 3D coordinates.
Intermediate switch names (':' delimited) can be provided and will be created
if needed (e.g. Topology=topo-tree:sw_root:s1:s2).
For torus3d, the format is topo-name:torus_name:x:y:z
(e.g. Topology=topo-torus:pod1:2:3:1).
For cloud nodes, the only field that can be set with the --conf flag is Topology, and when the node is powered down the topology will be restored to what is defined in the configuration files.
Examples using scontrol:
scontrol create NodeName=d[1-100] ... Topology=topo-switch:s1,topo-block:b1"
scontrol update NodeName=d[1-2] Topology=topo-switch:s2,topo-block:b2"
# Remove nodes from all topology
scontrol update NodeName=d100 Topology=
Examples using slurmd --conf:
slurmd -Z --conf "... Topology=topo-switch:s1,topo-block:b1"
slurmd -Z --conf "... Topology=default:b1"
# Omit -Z for cloud nodes
slurmd --conf "Topology=topo-cloud:s1"